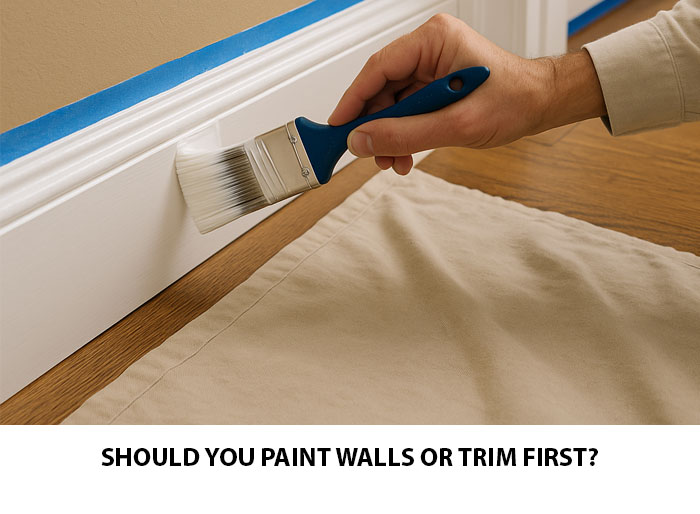
Should you paint walls or trim first? It’s really important to know which one you should do when you’re doing interior painting, whether it’s just one room or every wall inside your home. It can make a huge difference in how it all turns out and if it looks professional or like an amateur did it. If you want it to look as close to perfect as possible, you need to know what the advantages and disadvantages are of both.
Do You Paint Walls Or Trim First?
When getting ready to paint a room, one question always seems to come up: Should you paint walls or trim first? There’s no single rule, but most painters agree that starting with the trim can save time and frustration, especially if both need a fresh coat. Here’s why:
- Trim work is more detailed. It takes a steady hand and careful prep. It’s best to knock it out before wall painting begins.
- Freshly painted walls are easier to mess up. If you paint walls first, you risk nicking or dripping on them while doing trim later.
- Walls are simpler to mask. Once the trim is dry, it’s easy to run tape along the edges for a sharp, clean finish on the walls.
- Baseboards often need extra attention. From dents and dings to layers of old paint, they usually need sanding, patching, and priming.
- You’ll get cleaner lines. Painting trim first and allowing it to cure fully (give it about a day) makes taping and cutting in along the wall edges much neater.
So, should you paint walls or trim first? In most cases, trim comes first, giving you more control, fewer touch-ups, and a better-looking result.
The Pros of Painting Trim First
There are a few different ways to approach a painting project, but when it comes to the question should you paint walls or trim first, most pros stick with trim. Here’s why it tends to work better:
- Trim prep can get messy. Caulking, sanding, and priming all happen before paint goes on, and it’s easier to do this without worrying about freshly painted walls.
- It keeps things clean. If you paint the trim first, you won’t have to stress about getting smudges or drips on your finished wall color.
- Taping is simpler. After the trim is dry, painters tape goes on easily along the straight edges, making it easier to get clean, sharp wall lines.
- Walls go faster. Once the trim is painted and protected, you can roll the walls quickly without stressing over corners and edges.
All things considered, when asking should you paint walls or trim first, starting with the trim helps you stay efficient and end up with a neater, more professional look.
The Cons of Painting Trim First
Even though many painters recommend starting with the trim, it’s not without a few trade-offs. If you’re wondering should you paint walls or trim first, it’s worth knowing what to expect:
- Dry time slows you down. You’ll need to let the trim dry completely—usually a full day—before taping it off and painting the walls.
- Touch-ups may still be needed. When cutting in near the trim, it’s easy to accidentally bump it with a brush or roller, especially in tight spaces.
- Sloppy taping shows. If your tape job isn’t clean or the edges aren’t sealed properly, uneven lines can be more obvious once the walls are finished.
So while painting trim first often leads to a cleaner look, it does take more time and attention to detail to get it right.
Pros of Painting Walls First
Though many painters lean toward starting with the trim, there are some good reasons to flip the order. Here’s why beginning with the walls might work better for you:
- You can dive right in. Rolling the walls takes less prep than trim work, so you can get started faster without waiting on dry times.
- It’s beginner-friendly. For anyone new to painting, it’s easier to get comfortable with wide, open areas before dealing with detailed trim work.
- Mistakes are easy to fix. If wall paint splashes onto the trim, no stress, you’ll cover it later when you finish the trim.
While painting walls first might not be the standard pro approach, it can make the process simpler and less intimidating for DIY painters.
Cons of Painting Walls First
Starting with the walls might seem easier at first, but it comes with some drawbacks:
- Clean lines are harder to achieve. Brushing in trim next to finished walls takes a steady hand or flawless taping, and mistakes are easier to notice.
- Wall touch-ups may be needed. It’s not uncommon to accidentally swipe trim paint onto your freshly painted walls while working close to the edges.
- Taping the walls is trickier. Unlike the trim’s defined edges, walls often have slight imperfections that make it tough to tape straight and evenly.
While painting the walls first can work, it often requires extra care to get the polished results you’re probably hoping for.
How To Paint A Room And The Supplies You’ll Need
Make your painting project smoother by gathering the right tools and materials beforehand.
Here’s a list of essentials you’ll likely need:
- Patch kit and putty knife – Great for filling in nail holes or smoothing rough spots before you paint.
- Paint trays and liners – These keep things organized and make cleanup a breeze.
- Angled brush – Ideal for detailed edges and corners where rollers can’t reach.
- Sanding block or paper – Prepares surfaces for better paint adhesion.
- Plastic sheets or drop cloths – Protect your floors and furniture from drips and splatters.
- Roller – Covers large areas quickly with smooth, even coats.
- Primer – Use it if your surface needs extra coverage or you’re painting over a darker color.
- Painter’s tape – Helps you get straight, clean lines along trim, ceilings, and edges.
- Paint – Choose your color and finish based on the look and durability you’re going for.
- Step stool or ladder – Essential for reaching high corners or ceilings.
- Soft, damp cloths – Handy for wiping up stray paint before it dries.
Choosing The Color And Sheen
Picking a paint color can feel like a fun adventure or a total headache. With so many shades to choose from, it’s easy to get overwhelmed. A good way to narrow things down is by selecting your top three contenders and having sample sizes mixed at your local paint store. Once you’re back home, brush those samples onto different walls throughout the space. Watch how the color shifts in morning, afternoon, and evening light, it can look totally different depending on the time of day.
When it comes to selecting a finish, think about the room’s function. Kitchens and bathrooms benefit from a semi-gloss finish because it’s easy to clean and stands up to moisture. Satin offers a bit of shine and works well in bedrooms or family areas. For cabinets, doors, and trim, high gloss gives a polished, durable look that holds up over time.
1: Preparation
Begin by clearing as much space as possible, either push furniture to the middle of the room or take it out altogether. Use protective coverings to shield both the floor and any remaining items from splatter. Take off all light switch covers and outlet plates. Wipe down the walls using a moist rag to get rid of any built-up dirt or dust. Patch any imperfections using filler, then lightly sand the area once it dries to create a smooth surface for painting.
2: Painting The Trim
Start by painting the baseboards and trim using a durable, easy-to-wipe finish like semi-gloss. This type of paint stands up well to everyday wear, including scuffs and minor impacts. After the trim has fully cured, ideally after a full day, carefully apply painter’s tape along all the edges, including around windows and any hardware. Make sure to press the tape down tightly to keep paint from seeping underneath.
3. Painting The Ceiling
Once the trim is done, the next step for many painters is tackling the ceiling. Doing this before the walls helps prevent unwanted drips from ruining your wall finish. It’s also a great way to make use of the trim’s drying time. Begin by using a brush to carefully outline the ceiling edges. Then use a roller with a ⅜-inch nap and flat paint for the main surface. Apply the first coat in one consistent direction, then switch directions for the second coat to ensure even coverage.
4. The Edges
Grab an angled brush and start by outlining the edges where the roller won’t reach—along ceilings, corners, and around trim. This technique, known as cutting in, helps define clean lines before you fill in larger areas. Tackle one section at a time so the brushwork stays wet and blends smoothly when you roll paint over it.
5. Wall Painting
Transfer your paint into a tray and coat the roller evenly before starting. To prevent streaks or uneven patches, keep a consistent wet edge as you work. Most walls will need two coats for full coverage, but don’t rush; let the first coat dry thoroughly. Water-based paint usually needs a few hours, while oil-based versions may take a full day.
Once everything’s dry, scan for any thin spots or areas that need a bit more coverage and touch them up. For sharper edges, peel the painter’s tape slowly while the paint is still a bit soft.
6. The Cleanup
When you’re done painting, clean your brushes and rollers right away to prevent the paint from hardening. For latex or water-based paints, a rinse under warm water usually does the trick. If you used oil-based paint, you’ll need something stronger, like mineral spirits or paint thinner, to break it down. Once everything is fully dry, go ahead and reinstall switch plates, outlet covers, and any removed fixtures to wrap up the project.
Painting The Trim After You’ve Painted The Walls
If the walls have already been painted, give them a full day to dry before moving on to the trim. Begin by wiping down the trim to clear off any grime, dust, or oily residue. Clean surfaces help the paint stick properly. Once everything’s prepped, apply painter’s tape where the trim meets the wall, pressing it down firmly to seal the edge.
Cover your floors with plastic or drop cloths to catch any splatter. Grab a quality angled brush and dip it lightly in paint; too much can cause drips. Use steady, smooth strokes and follow the direction of the wood grain as you work around corners and edges. For the sharpest finish, remove the tape while the paint is still slightly tacky.
Painting The Walls
Few things are more annoying than putting in the effort to paint, only to end up with streaks or visible roller marks. But a few simple techniques can help keep your finish clean. Start by avoiding heavy paint loads, and apply thin, even layers for better control and faster drying. One key trick is keeping a wet edge. That means overlapping each stroke while the paint is still fresh to blend the sections smoothly.
If you’re working in an area where keeping a wet edge isn’t possible, use light strokes and a nearly dry roller to gently blend the edges. When it’s time to reload your roller, begin right where you left off, on those feathered edges, to keep everything looking seamless.
Getting Clean Lines
You don’t have to be a pro to get crisp, straight paint lines; just a little prep and the right technique can go a long way. Here’s how to make your DIY edges look sharp:
Stick with quality tape. Cheaper brands often let paint seep through. Trusted names like ScotchBlue or FrogTape offer better adhesion and edge protection.
Start with a clean surface. Make sure the trim and walls are free of dust, oils, or grime, or the tape won’t stick well.
Seal the tape edge with base paint. Before applying your final color, brush a thin layer of the base wall or trim color along the tape. This seals any gaps.
Press it down firmly. Use your fingernail or a flat tool to really press the tape into the surface, especially along the edges.
Go easy on the paint. Near the tape, avoid overloading your brush or roller. Use gentle, even strokes to stay in control.
Time your tape removal. Peel the tape off while the paint is still slightly wet, pulling it back at an angle. If the paint’s already dry, score along the edge with a sharp blade before pulling to avoid peeling the paint.
Do You Need To Use Primer?
Primer acts as a base layer for paint, but do you really need it every time? Not necessarily. It depends on the condition of the surface and the type of project. For brand-new drywall, raw wood, or anything porous, primer is key to sealing the surface and helping paint go on evenly. It’s also useful when you’re covering deep stains or switching from a dark color to a lighter one. And in damp spaces like kitchens, bathrooms, or basements, a mold-resistant primer can help prevent peeling and mildew.
On the flip side, you can probably skip the primer if:
- The existing paint is in good shape
- You’re painting with a similar or slightly darker color
- Your paint already includes a built-in primer
- It’s a minor touch-up or a low-stakes area
So, while primer isn’t always a must, knowing when to use it can make a big difference in how your paint job turns out.
Should You Paint Walls Or Trim First Conclusion
So, should you paint walls or trim first? The pros generally agree you should paint the trim first. However, there are some advantages to painting the walls first. As with everything in life, there are tradeoffs to both.


Leave a Reply